Machine Learning in Dataiku: Let’s train an image classifier!
Posted 1 year ago by Milos Svana
More and more companies are integrating machine learning (ML) and artificial intelligence (AI) into their products. Last year was unusually fruitful. We experienced the release of Github Copilot, DALL-E 2, Stable Diffusion, ChatGPT and many other interesting AI services.
Getting your company onboard with ML and AI can be challenging. The number of experts in this field is still far below market demand. The path to become an AI professional is rigorous and long. You need to master aspects of software engineering, database and big data management, statistics, and many parts of mathematics such as linear algebra, calculus or probability theory. This takes a lot of time.
Dataiku can make this journey a little easier. It provides a complete environment to get started with ML, including (almost) all the necessary libraries, software tools, and most importantly, an easy-to-use web interface where you can unleash your inner data scientist. This interface abstracts away the complexity hidden behind various machine learning algorithms and helps you accelerate ML model development.
In addition to its core ML features, Dataiku also provides tools for loading data from various sources, advanced data visualization, or statistical analysis. In this article, we will show you how you can use Dataiku to quickly start training an image classification model, evaluate the results, and start classifying images; all without writing a single line of code.
You can deploy Dataiku’s Community Edition locally and use it for free. We will use a setup with an NVIDIA GPU. This is not a must. You can install and use Dataiku on any x86 machine with sufficient performance. However, there are machine learning algorithms that can take advantage of a dedicated NVIDIA chip.
Installation
We’ll install and run Dataiku on a dedicated PC with an older GTX 980 Ti GPU running Pop!_OS 22.04. We download and unpack Dataiku Community Edition installer:
$ wget https://cdn.downloads.dataiku.com/public/dss/11.0.2/dataiku-dss-11.0.2.tar.gz
$ tar xzf dataiku-dss-11.0.2.tar.gz
There are a few software requirements we need to resolve before installing Dataiku. We need nginx, Java, Python 2.7 and Python 3.7. Thankfully, the Dataiku installer includes a script that does the work for us. By doing so, it also adds a repository for installing older Python versions:
$ sudo -i "[PATH]/dataiku-dss-11.0.2/scripts/install/install-deps.sh"
There seems to be a small bug, though: the python3.7-distutils package required by the installer is not installed by the helper script. We can do that manually:
$ sudo apt install python3.7-distutils
If we want to train our models on a GPU, we also need the proprietary NVIDIA drivers, CUDA, and cuDNN. Since we are using an older GPU, we are also going to use an older driver version. On Pop!_OS, CUDA and cuDNN can be installed with apt:
$ sudo apt install nvidia-490 system76-cuda-latest system76-cudnn-11.2
Having resolved all prerequisites, we can finally install Dataiku itself. The installation script lets us choose the installation location and a port that will be occupied by the web interface:
$ dataiku-dss-11.0.2/installer.sh -d [INSTALLATION_PATH] -p [PORT]
To start Dataiku, run:
$ [INSTALLATION_PATH]/bin/dss start
We can now open the Dataiku interface in a browser using the port we selected above, for example http://localhost:11000/. After registering for a free license, use the default username and password admin to log in:
Our use case: fast-food image classification
We’ll use Dataiku to train a fast-food image classification model. To solve this task, we of course need some training data: we’ll download the Fast Food Classification Dataset-V2 dataset from Kaggle. This dataset contains images of 10 different fast-food dishes. We have 2,000 images for each dish type, so 20,000 images in total.
To upload the dataset to Dataiku, we first need to create a new project. We can either click on the Blank project card or use the New project button. We give our project a descriptive name such as Fast Food Classification, and click CREATE.
Dataiku represents projects as Flows. A flow usually starts with one or more datasets you put into Dataiku from outside. You can use Recipes that represent various data transformations and their result is a new dataset. These can then serve as inputs for other recipes creating a multistep pipeline. There are recipes for data filtering, aggregation, joining multiple datasets, and many other operations. If you can’t find a recipe fitting your needs, you can implement your own in Python, R, or SQL.
Let’s start by creating a dataset with all of our fast-food images. We open our (currently empty) flow through the top menu and then create a new folder by selecting + DATASET > Folder. Name this folder images.
Open the new folder and create a subfolder for one of our fast-food types; say, Fries. We open this subfolder and simply drag-and-drop all images of fries from the Kaggle dataset. This process can be then repeated for all other food categories.
Now that we’ve uploaded all images and sorted them nicely into different subfolders, we have to perform some preprocessing. Dataiku can train the image classification model very easily, but to do so, it needs an auxiliary tabular dataset associating each file path with a category label. Fortunately, there is a recipe for creating a list of files in a folder. Go to the main Flow page and add this recipe by selecting + RECIPE > Visual > List Folder Contents. Select the images folder as the input and choose a name for the output dataset. After creating the recipe, we can also map the first part of each file path (name of the subfolder) to a new Class column. This is a convenient way to get the labels we need to train the model. Finally, we execute the recipe by clicking on the RUN button.
Training a classifier
Now that we have all the data we need, we can now train a classification model. Since this is our first time running Dataiku, we need to create a new code environment for image classification. This can be done easily in the Dataiku admin panel (although the option is a bit hard to find). We need to go to Applications > Administration > Settings > Misc. and find the Computer vision code environment section. In the Image classification code environment, choose a Python version and click CREATE CODE ENVIRONMENT.
In the analysis screen, go to the Models tab and create a new Image classification model. Select the Class column as a target and images as our image folder.
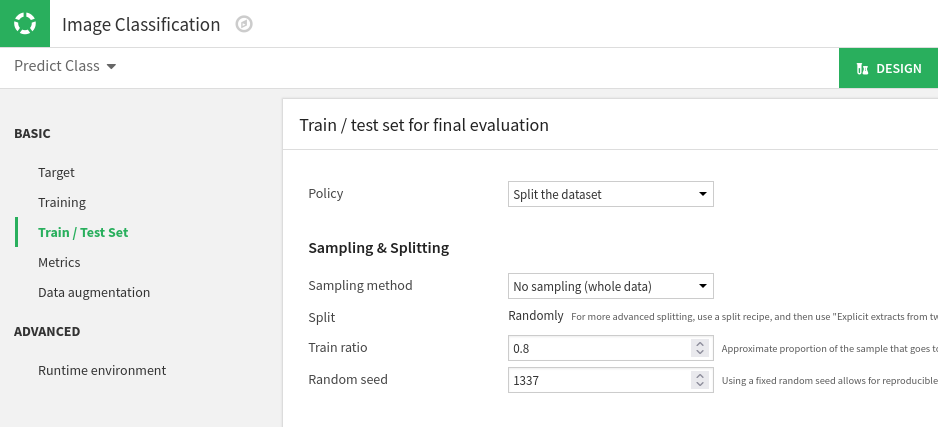
We can change a lot of things in the model configuration. By default, Dataiku would use the first 100,000 images to train and evaluate the model. We want to use all of them. So we can go to the Train / Test Set section and switch the Sampling method to No sampling. Here, we also see that we will use 80% of our dataset for training. The rest will be used to test and evaluate our model on images that it hasn’t seen before.
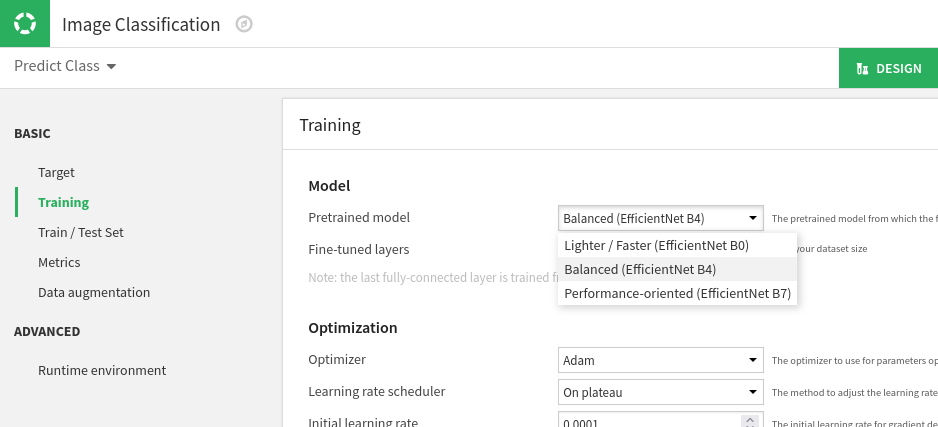
The next thing we can tweak to meet our needs is the neural network architecture. If we enter the Training section, we see that Dataiku uses EfficientNet to classify images. We can choose between 3 variants, depending on which tradeoff between speed and accuracy fits our needs.
Finally, we start the training by clicking the TRAIN button. In the dialog, we can optionally ask Dataiku to train the model on a GPU.
All we have to do now is make ourselves comfortable, maybe grab a coffee or a snack, and wait until the training is completed. After finishing at least one epoch, we start seeing graphs displaying how the performance of our model changes over time. Dataiku shows us the area under the ROC curve as well as the current loss function value.
Is our new model any good?
Even on GPUs, training neural networks takes time. In our case, we were done after about 2 hours and 30 minutes. What can we say about the quality of the resulting classification model? Was the time worth it?
One of our favorite Dataiku features is model evaluation. We can click on the name of a trained model and examine it in detail. There is a lot of information we can find on this screen. The most straightforward evaluation metric we can check is accuracy—the percentage of images in the test set classified correctly by the model. We reached an accuracy of about 78%. Not bad for a classifier trained on 16,000 images with 10 different classes. If this level of accuracy is not enough for your use-case Dataiku offers many tools to improve the performance of your model: early stopping, retraining the last layer of a pre-trained neural network, or data augmentation features letting you extend your dataset by automatically generating additional images by cropping, rotating or adjusting the color palette of existing images.
However, Dataiku offers even more interesting evaluation tools, such as the Confusion Matrix. It shows us the testing part of our dataset as a two-dimensional grid. Each individual cell tells us how many images that belong to a category determined by the row of our grid were predicted as belonging to a category represented by a given column. Clicking on a cell then shows us images matching this expected+predicted combination. We can, for example, check all 25 images classified as burgers even though they are actually sandwiches.
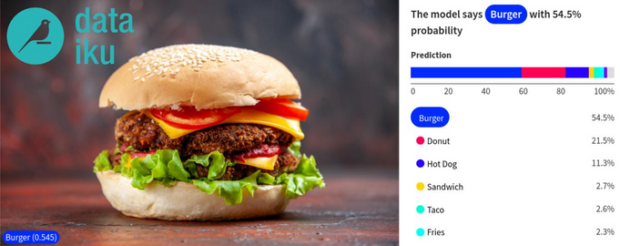
Let’s now have a look at how we can classify any arbitrary image using our newly trained model. All we have to do is go to the What if? section and upload the image we want the model to classify.
If we are happy with our model, we can easily deploy it. We won’t go into much detail here, but when you deploy your model, it becomes a part of your Flow. You can then do batch prediction on a new dataset or expose your model as an API.
Conclusion
Looking at Dataiku as someone who already has experience with ML, we think that it is a great productivity booster. It’s also a useful tool for newcomers to ML, as it lets you experiment with all the concepts you are learning about. The list of features we like would be long, but some of the top items include the ability to quickly iterate over different model configurations, tools for evaluating a trained model, quick model deployment, and the concept of organizing everything into Flows.
Can Dataiku replace your Jupyter notebooks and other more code-oriented approaches? Not completely. There will always be problems for which you need to develop customized solutions. In such situations, Dataiku and custom code can actually become good friends. As we mentioned earlier, you can write Flow recipes in Python or other languages. But, there is more. Dataiku also lets you create custom models or add Jupyter notebooks to your projects. We can easily imagine a scenario where you use built-in recipes for data preprocessing and then define a custom Keras model.
There are a few caveats, though. For some reason, Dataiku doesn’t support newer Python versions. This means you can’t, for example, take advantage of the performance improvements offered by the latest Python 3.11. We also don’t think that you can fully appreciate Dataiku without some knowledge of ML. It hides a lot of details from you, but you still need to understand the high-level concepts: the basic steps of building a machine learning model, data cleaning and preprocessing, different types of ML problems, or evaluation metrics.
Overall, Dataiku is a great product with a lot of potential. But you don’t have to take our word for it. Go and try Dataiku Free Edition. You can either download ithe community edition like we did or use Cloud version with Free Trial which doesn’t require installing anything locally. We definitely feel confident using it in future projects and recommending it to anyone who wants to apply ML methods to solve practical problems.


Nice article about Machine learning
thanks for info