Running ExtJS Code Inside Liferay Portlets
Jiri Znoj
8 years ago 14.2.2018
I recently wrote a blog post Running ExtJS app as a Liferay portlet, you can read Running ExtJS as a Liferay portlet: Part 1 and Running ExtJS as a Liferay portlet: Part 2 here.
ExtJS is powerful JavaScript framework with some pretty cool features. If you don’t know ExtJS but would like to, this page is a good place to start.: http://docs.sencha.com/extjs/6.5.1/guides/quick_start/introduction.html.
The ExtJS app we used in a previous blog post (Running ExtJS App as a Liferay Portlet: Part 1) was built by Sencha Cmd and had some limitations inside the Liferay portlet.
In this post, I will show you how to run ExtJS code in Liferay portlets without building it in Sencha Cmd. One advantage of this solution is that you can run more than one Liferay portlet with ExtJS code in one page. You don’t need to use Sencha Cmd to build your app when the code changes; you can use Java code and some data from Liferay Portal in ExtJS.
One disadvantage to this solution is that you can’t develop an ExtJS app separately, build it, and include it only in the production build. You need to copy whole ExtJS framework into Liferay Portal and link everything to the view.jsp file.
Liferay
Prepare the Environment
Liferay IDE
Download and install Eclipse Neon.3 + Liferay IDE 3.1.2 GA3 or the latest version from here: https://web.liferay.com/downloads/liferay-projects/liferay-ide.
Liferay Portal
Download Liferay Portal Bundled with Tomcat from here: https://www.liferay.com/downloads.
Create a Liferay Portlet in IDE
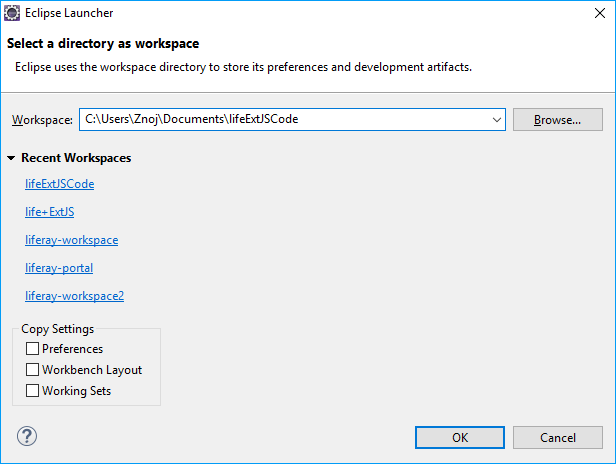
Create a new workspace and a new Liferay Portlet. Although these steps are the same as in previous post Running ExtJS App as a Liferay Portlet: Part 2, I’m including them here so you don’t have to refer back to the post and possibly miss important information. The names in the earlier post are different than the ones in this post, and I hope that isn’t confusing.
First, let’s create a new workspace and Liferay Portlet the same way as we did in Running ExtJS App as a Liferay Portlet: Part 2.
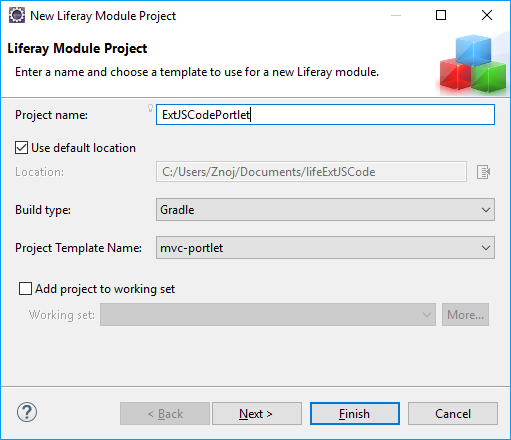
After creating the new workspace, add a new project. Choose New > Liferay Module Project to create new Liferay portlet. The New Liferay Module Project dialog box displays.
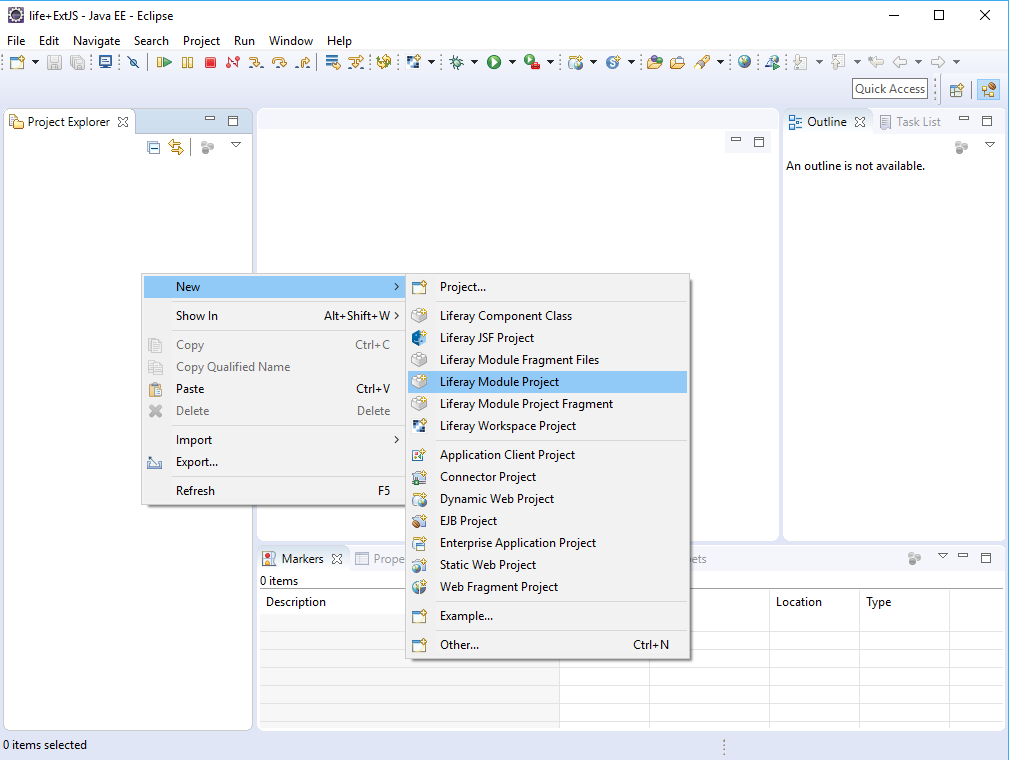
Enter the following information in their respective fields:
Project name: ExtJSCodePortlet
Build type: Gradle
Project Template Name: mvc-portlet
In the Component Class Name field, enter ExtJSCodeController.
In the Package Name field, enter com.extjs.extjscodeportlet.
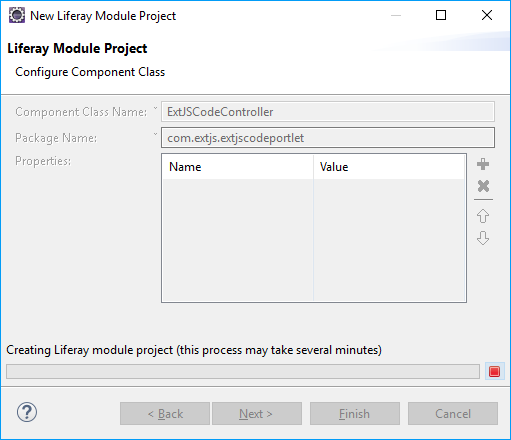
Liferay creates the module project.
Edit the Liferay Portlet to Contain the ExtJS App
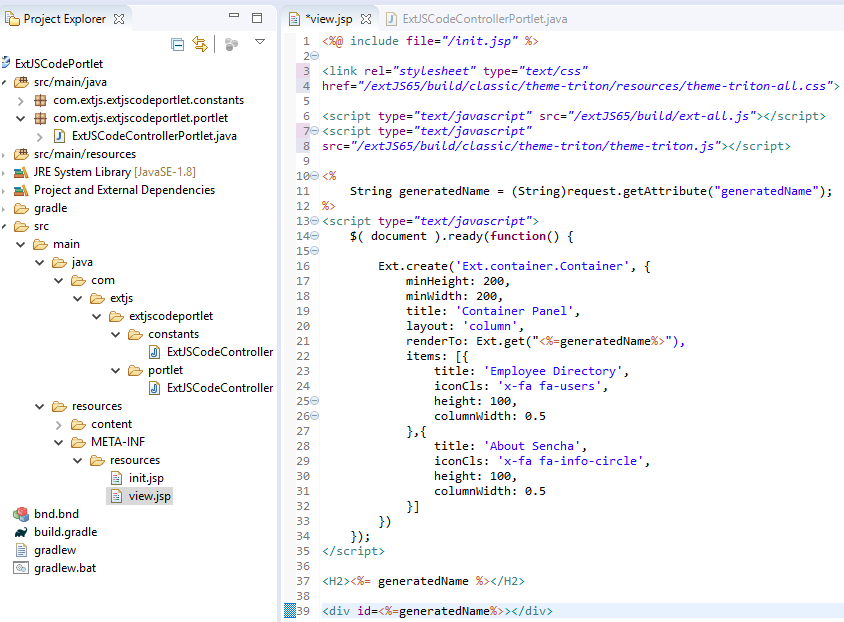
When the new portal is ready, edit the src/main/resources/META-INF/resources/view.jsp file.
Add default toolkit (classic) – default style (triton) to the the CSS style to add the JavaScript file to link ExtJS framework components and JavaScript file for the theme.
<link rel="stylesheet" type="text/css" href="/extJS65/build/classic/theme-triton/resources/theme-triton-all.css">

<script type="text/javascript" src="/extJS65/build/ext-all.js"></script>
<script type="text/javascript" src="/extJS65/build/classic/theme-triton/theme-triton.js"></script>
Next, create a place to render our ExtJS components. In this solution, you demonstrate the connection between the Controller of Liferay Portlet and the View with ExtJS code in it.
Make sure that if you have more than one portlet with ExtJS code on one page, the component will be rendered exactly where it should be. To do this, generate a random number in the Controller, send it to the View, add it as an id of the DIV container, and generate the ExtJS component(s) there.
Execute the following code in Java. You will receive a random number as a string from the Controller.
<%
String generatedName = (String)request.getAttribute("generatedName");
%>
Next, verify that you can see that number as an H2 title in HTML, and place it as an id of the DIV container where the ExtJS component will be rendered.
<H2><%= generatedName %></H2>
<div id=<%=generatedName%>></div>
Add basic ExtJS code as illustrated below, and put it into JavaScript function $( document ).ready(). Ready() function to ensure the code will be executed when DOM is ready.
This is very important, because the DIV needs to be rendered in the DOM when an ExtJS script is executed, as the Ext.container.Container was placed into that DIV using renderTo.
The ready() function from ExtJS framework is not used because it doesn’t allow more than one Liferay Portlet with ExtJS code in it in one web page. If you don’t want more than one Liferay Portlets with ExtJS code in one web page, then you could use the ExtJS Ext.onReady() function.
<script type="text/javascript">
  $( document ).ready(function() {
  Ext.create('Ext.container.Container', {
      minHeight: 200,
      minWidth: 200,
      title: 'Container Panel',
      layout: 'column',
      renderTo: Ext.get("<%=generatedName%>"),
      items: [{
          title: 'Employee Directory',
          iconCls: 'x-fa fa-users',
          height: 100,
          columnWidth: 0.5
        },{
          title: 'About Sencha',
          iconCls: 'x-fa fa-info-circle',
          height: 100,
          columnWidth: 0.5
      }]
  })
});
</script>
In the following image, the codes mentioned above are placed together in one view.jsp file.
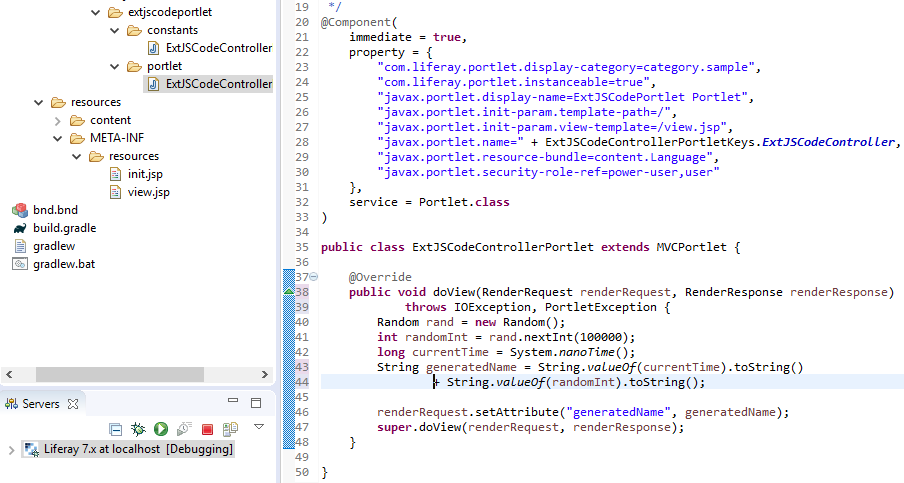
Don’t forget to modify the Controller to generate a string with a randomly generated number.
Open a file to edit in “PortletName”>src>main>java>com>extjs>extjscodeportlet>portlet>”ExtJSCodeControllerPortlet”.java.
This file you should have class extends from MVCPortlet. In this class, override method public void doView(RenderRequest renderRequest, RenderResponse renderResponse); and add the randomly generated number by renderRequest.setAttribute(“generatedName”, generatedName), where generatedName is a String variable with randomly generated number. Send this variable by this method to the View.
@Override
public void doView(RenderRequest renderRequest, RenderResponse renderResponse)
              throws IOException, PortletException {
    Random rand = new Random();
    int randomInt = rand.nextInt(100000);
    long currentTime = System.nanoTime();
    String generatedName = String.valueOf(currentTime).toString()
              + String.valueOf(randomInt).toString();
    renderRequest.setAttribute("generatedName", generatedName);
    super.doView(renderRequest, renderResponse);
}
When our portlet is successfully deployed, it is prepared for the Liferay Portal.
After editing the View and Controller, we are ready to deploy the portlet by choosing Gradle Tasks > “PortletName” > build > deploy in the right panel of Liferay IDE.

When our portlet is successfully deployed, it is prepared for the Liferay Portal.
ExtJS Framework
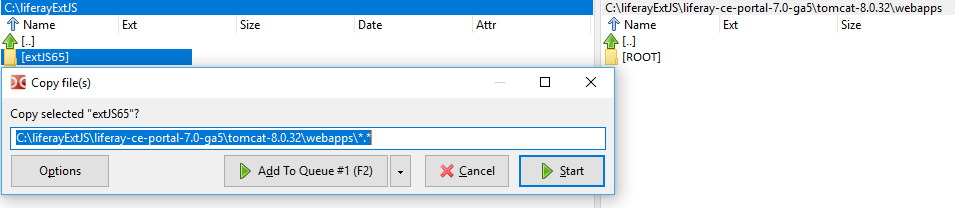
Download the ExtJS Framework here: https://www.sencha.com/products/extjs/evaluate/ and copy the extracted folder into Liferay Portal’s webapps folder placed inside the tomcat-* folder:
Run Liferay Portal in IDE
Follow the same steps as in “Run Liferay Portal in IDE,” in Running ExtJS as a Liferay portlet: Part 1. If you haven’t already imported a Liferay Portal, please do so following those same steps.
Portlet with ExtJS Code in Liferay Portal
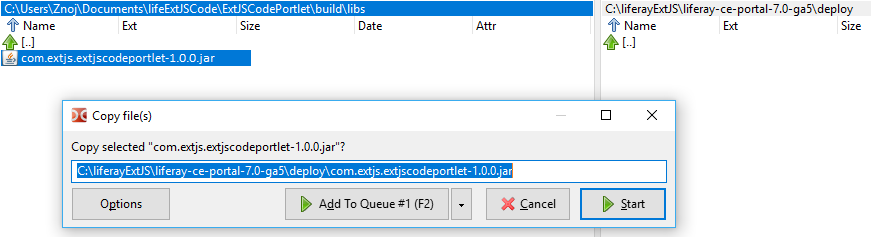
Find the built portlet (.jar file) in “workspace directory”/”PortletName”/build/libs and copy this file into “Liferay Portal folder”/deploy.
When the server is running the .jar file (inside the deploy folder), it is automatically processed by the server and removed from the deploy folder of Liferay Portal, so don’t be surprised if the file disappears.
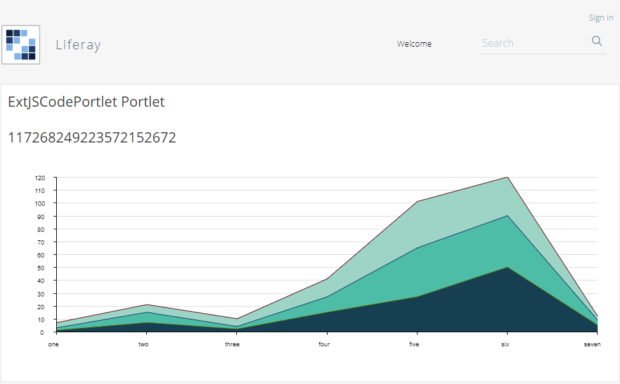
When processing of the deployed portlet file is finished, access the portlet in Applications > Sample in the running Liferay Portal.

The example above was expanded to have charts with data stored inside the Controller and a class was created for the data.
public class ChartData {
    public String name;
    //for demonstration purposes not in array
    public int data1;
    public int data2;
    public int data3;
    public int data4;
    public int data5;

    public ChartData(){
        super();
    }

     public ChartData(String name, int data1, int data2, int data3, int data4, int data5){
         this.name = name;
         //for demonstration purposes not in array
         this.data1 = data1;
         this.data2 = data2;
         this.data3 = data3;
         this.data4 = data4;
         this.data5 = data5;
    }
}
Define the data in ExtJSControllerPortlet as arrays, and put them into variable renderRequest as attributes.
public class ExtJSCodeControllerPortlet extends MVCPortlet {
    String fields[] = {"name", "data1", "data2", "data3", "data4", "data5"};
    ChartData data[] = {
        new ChartData("one", 1, 2, 4, 8, 10),
        new ChartData("two", 7, 8, 6, 1, 3),
        new ChartData("three", 2, 2, 6, 1, 3),
        new ChartData("four", 15, 12, 14, 12, 17),
        new ChartData("five", 27, 38, 36, 13, 33),
        new ChartData("six", 50, 40, 30, 20, 10),
        new ChartData("seven", 5, 4, 3, 2, 1)
    };

    @Override
    public void doView(RenderRequest renderRequest, RenderResponse renderResponse)
                  throws IOException, PortletException {
        Random rand = new Random();
        int randomInt = rand.nextInt(100000);
        long currentTime = System.nanoTime();
        String generatedName = String.valueOf(currentTime).toString()
        + String.valueOf(randomInt).toString();

        renderRequest.setAttribute("generatedName", generatedName);
        renderRequest.setAttribute("fields", fields);
        renderRequest.setAttribute("data", data);
        super.doView(renderRequest, renderResponse);
    }
}
And finally, add the code for view.jsp with all of the needed inputs, getting attributes from the Controller, transforming the Java array to a JavaScript array with an ExtJS store definition and an ExtJS Cartesian component.
<%@ include file="/init.jsp" %>
<%@ page import="com.extjs.extjscodeportlet.portlet.ChartData" %>

<link rel="stylesheet" type="text/css"
href="/extJS65/build/classic/theme-triton/resources/theme-triton-all.css">
<link rel="stylesheet" type="text/css"
href="extJS65/build/packages/charts/classic/triton/resources/charts-all.css">

<script type="text/javascript" src="/extJS65/build/ext-all.js"></script>
<script type="text/javascript"
src="/extJS65/build/classic/theme-triton/theme-triton.js"></script>
<script type="text/javascript" src="extJS65/build/packages/charts/classic/charts-debug.js"></script>


<%
    String generatedName = (String)request.getAttribute("generatedName");
    String fields[] = (String[])request.getAttribute("fields");
    ChartData data[] = (ChartData[])request.getAttribute("data");
%>

<script type="text/javascript">

    // --------------------------- array of names --------------------------------
    var jsFields = new Array();
    <%for(int i = 0; i < fields.length; i++){%>
        jsFields[jsFields.length] = "<%=fields[i]%>";
    <%}%>

    //print out array of names
    console.log(jsFields);

    // --------------------- array of objects with values --------------------------
    var jsData = [];
    var key = jsFields[0];
    var obj = {};

    <%for(int i = 0; i < data.length; i++){%>
        var obj = {};

        obj[jsFields[0]] = "<%=data[i].name%>";

        //for demonstration, this could be solved with better class ChartData
        obj[jsFields[1]] = <%=data[i].data1%>;
        obj[jsFields[2]] = <%=data[i].data2%>;
        obj[jsFields[3]] = <%=data[i].data3%>;
        obj[jsFields[4]] = <%=data[i].data4%>;
        obj[jsFields[5]] = <%=data[i].data5%>;

        jsData.push(obj);
    <%}%>

    //print out array of objects with values
    console.log(jsData);

    // -------------------------- pure ExtJS 6.5 code -------------------------------
    $( document ).ready(function() {
        var myStore = Ext.create('Ext.data.JsonStore', {
            fields: jsFields,
            data: jsData
        });

        Ext.create({
            xtype: 'cartesian',
            renderTo: Ext.get("<%=generatedName%>"),
            minWidth: 600,
            minHeight: 350,
            insetPadding: 40,
            store: myStore,
            axes: [{
                type: 'numeric',
                position: 'left',
                fields: ['data1'],
                grid: true,
                minimum: 0
            }, {
                type: 'category',
                position: 'bottom',
                fields: ['name']
            }],
            series: {
                type: 'area',
                subStyle: {
                    fill: ['#0A3F50', '#30BDA7', '#96D4C6']
                },
                xField: 'name',
                yField: ['data1', 'data2', 'data3']
            }
        });
    });
</script>

<H2><%= generatedName %></H2>

<div id=<%=generatedName%>></div>
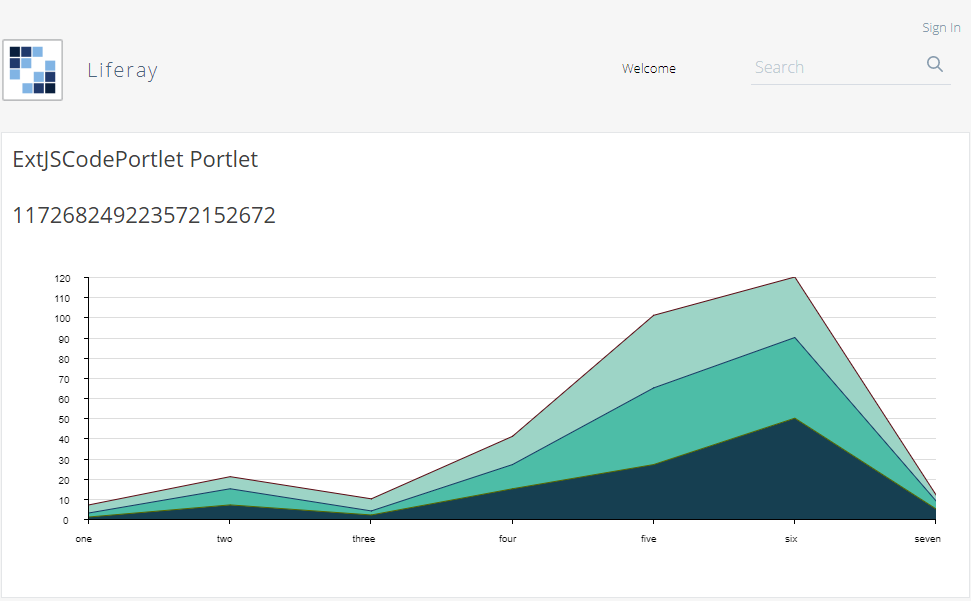
In this blog post, we ran ExtJS code inside a Liferay Portlet. We placed an ExtJS component into a unique div container. We included js files and CSS styles for all packages, themes, and ExtJS frameworks. After we copied the whole framework into Liferay Portal, we put together ExtJS code with Java inside Liferay Portlets with more portlets on one single web page together.
Conclusion
If you are interested in a different approach, building and placing ExtJS app inside Liferay Portlet, you can read instructions here: Running ExtJS as a Liferay portlet: Part 1.