




Configure Load Balancer for OpenAM 12

6 min read4.11.2015
Introduction
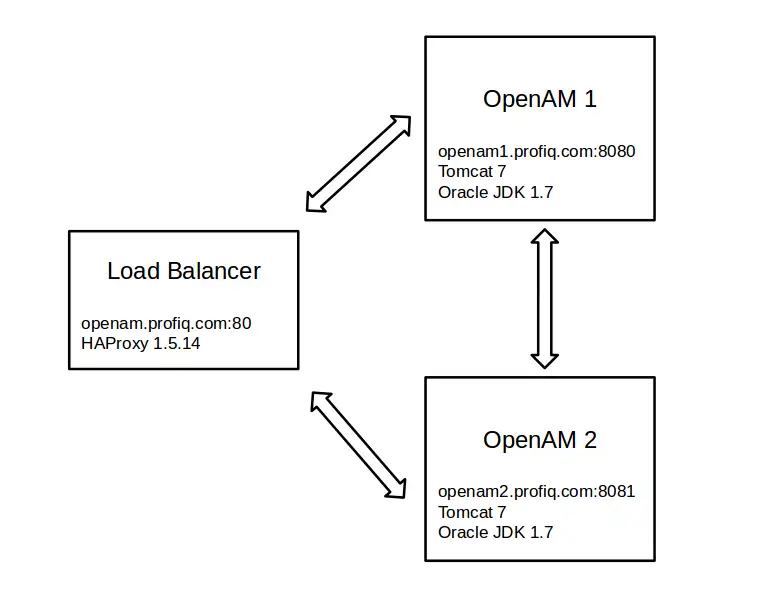
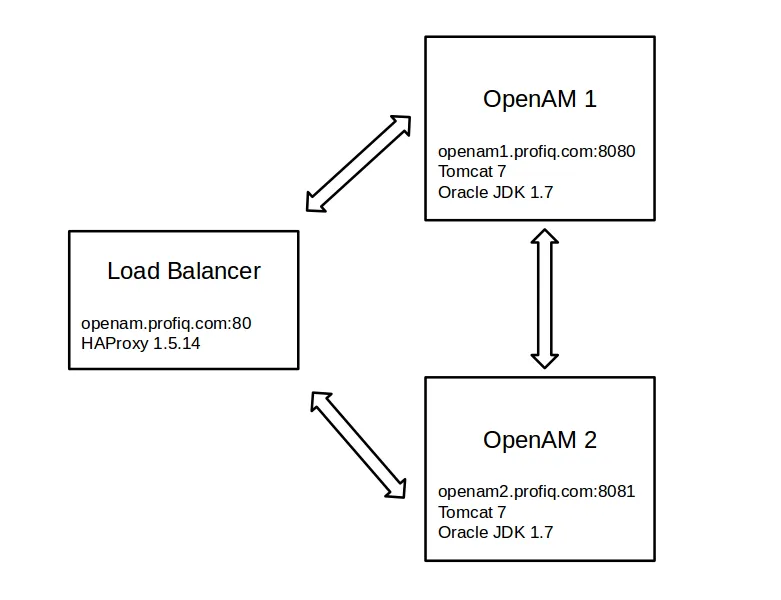
In this article I will demonstrate how to configure software Load Balancer (LB) for two OpenAMs.
OpenAM is a open source access management software provided by ForgeRock.
Load balancing aims to optimize resource use, maximize throughput, minimize response time, and avoid overload of any single resource. If a one server is down, LB redirect all requests to others servers which are up.
To simplify, I will configure LB, OpenAM 1 and OpenAM 2 on one virtual machine and OpenAMs will be configured with embedded data and config store. To read more about embedded config and data store please check chapters 1.4 and 1.5 here.
Prerequisites:
- configured virtual machine
- 2 x apache tomcat
- tomcat 1 is listening on port 8080
- tomcat 2 is listening on port 8081 (conf/server.xml, also it is necessary to change the port for shutdown )
- edit /etc/hosts to include all hostnames (all hostnames will have the same IP, because they are on the same machine)
- openam1.profiq.com
- openam2.profiq.com
- openam.profiq.com
Load Balancer
I used HA proxy software load balancer.
Download HA Proxy
You can download HA Proxy here.
Install HA Proxy from source
- Unpack HA Proxy:
# tar -xvf haproxy-1.5.14.tar.gz- Navigate into HA Proxy directory:
# cd ./haproxy-1.5.14- Compile HA Proxy. Compile for Linux kernel 2.6.32 or later and optimize the binaries for the install CPU architecture.
Note: you can check your linux version:
# make TARGET=linux2632 ARCH=native# uname -a
Linux centos6-64 2.6.32-504.8.1.el6.x86_64 #1 SMP Wed Jan 28 21:11:36 UTC 2015 x86_64 x86_64 x86_64 GNU/Linux- Install the compiled binary:
# make install- Copy the HA Proxy to yours directory
# mkdir /opt/HA-Proxy-1.5.14
# cp /usr/local/sbin/haproxy /opt/HA-Proxy-1.5.14
Configure HA Proxy
- Create the configuration file
# vim /opt/HA-Proxy-1.5.14/haproxy.conf- Add content into HA Proxy configuration file:
global
   maxconn 4096
   daemon

defaults
   mode http
   option tcpka
   retries 3
   option redispatch
   maxconn 1024
   timeout client 1h
   timeout connect 5000ms
   timeout server 1h

frontend fe
   bind openam.profiq.com:80
   default_backend be

backend be
   mode http
   balance roundrobin
   cookie SERVERID insert indirect nocache
   server openam1 openam1.profiq.com:8080 check cookie 1
   server openam2 openam2.profiq.com:8081 check cookie 2
   option http-server-close
   option redispatch
   appsession amlbcookie len 2 timeout 1h request-learn
Backend is configured for 2 OpenAMs (openam1 and openam2) and LB is listening on openam.profiq.com:80.
It is recommended to use stickiness (“appsession amlbcookie len 2 timeout 1h request-learn”) for the backend, it means, if you log in via openam1 a cookie is sent by the backend with backend-specific value, HA Proxy will then look for that cookie, and will store its value in a table associating it with the server’s identifier, for more info see.
You can find description for properties in to HA Proxy documentation here.
OpenAM 1
Download latest stable OpenAM
Download latest openam (currently it is OpenAM 12.0.1) from forgerock backtsage here.
Install OpenAM 1
- Deploy downloaded openam.war into tomcat
# cp /opt/OpenAM-12.0.1.war /opt/apache-tomcat-7.0.50/webapps/openam.war- Start tomcat 1
- Hit the openam1 page: http://openam1.profiq.com:8080/openam and you will see OpenAM Configuration Page
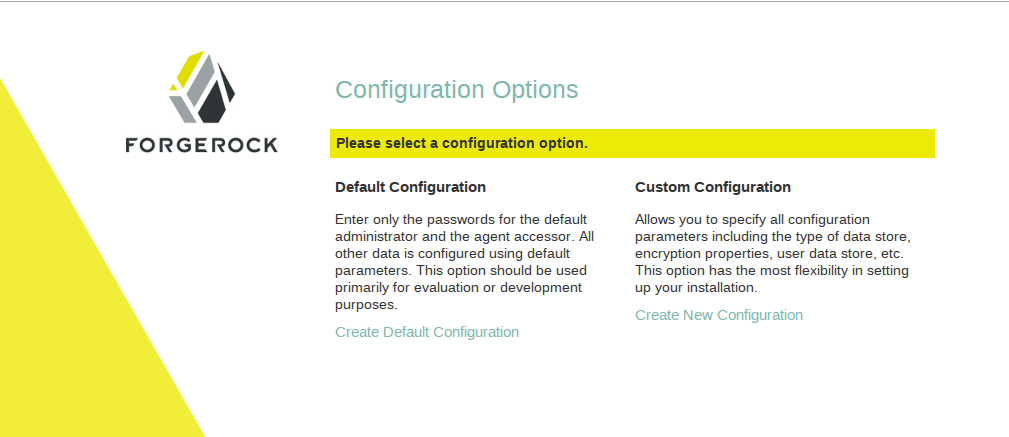
- Choose “Create New Configuration” and accept the license
- Step 1: Set amAdmin password and click next
- Step 2: Server config: Server URL = http://openam1.profiq.com:8080 Cookie Domain = .profiq.com Platform Locale = en_US Configuration Directory =/root/openam1
- Step 3: Configuration Data Store Settings
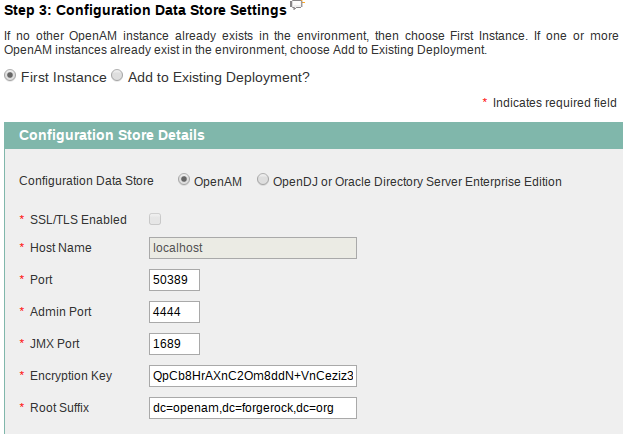
- Step 4: User Data Store Settings Set “OpenAM User Data Store”
- Step 5: Site Configuration
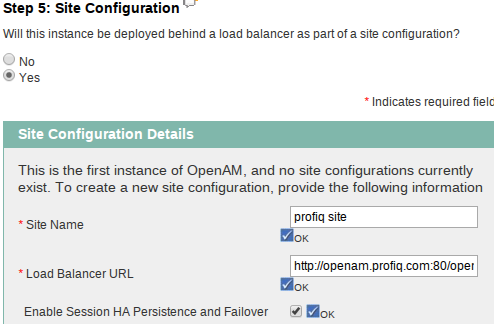
- Step 6: Default Policy Agent User set password
- Summary
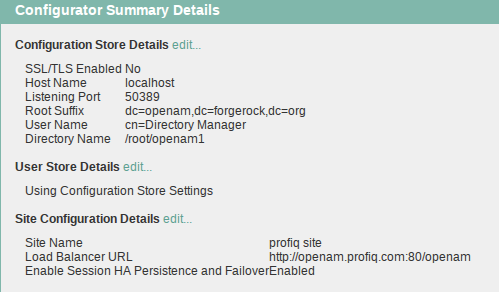
- Create Configuration
Note: For more info see OpenAM install guide
OpenAM 2
Install OpenAM 2
- Deploy downloaded openam.war into tomcat
# cp /opt/OpenAM-12.0.1.war /opt/apache-tomcat-6.0.39/webapps/openam.war- Start tomcat 1
- Hit the openam2 page: http://openam2.profiq.com:8081/openam and you will see OpenAM Configuration Page
- Choose “Create New Configuration” and accept the license
- Step 1: Set amAdmin password and click next
- Step 2: Server config: Server URL = http://openam2.profiq.com:8081 Cookie Domain = .profiq.com Platform Locale = en_US Configuration Directory = /root/openam2
- Step 3: Configuration Data Store Settings Set “Add to Existing Deployment” Server URL: http://openam1.profiq.com:8080/openam
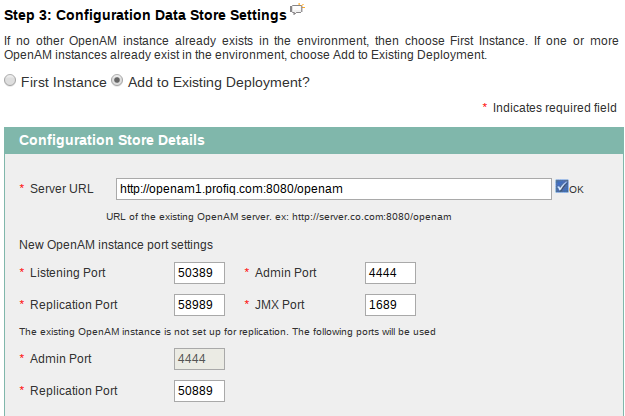
- Step 5 Site Configuration Site Name = profiq site Load Balancer URL = http://openam.profiq.com:80/openam Enable Session HA Persistence and Failover = true
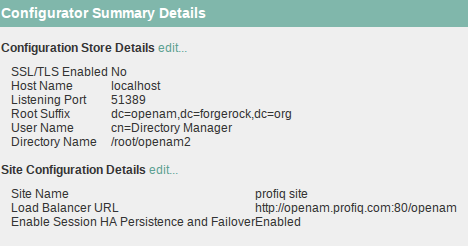
- Summary
- Create Configuration
Test Configuration
- Start load balancer:
# /opt/HA-Proxy-1.5.14/haproxy -f /opt/HA-Proxy-1.5.14/haproxy.conf- Hit the load balancer: http://openam.profiq.com/openam
- Login as amadmin
- if you check cookies there will be cookie amlbcookie = 01 (01 is ID of server, in my case means you are logged via OpenAM1)
- delete all cookies and shut-down openam1, login again, and observe the cookie amlbcookie. You can observe that second OpenAM server will be used and one can see it by looking at amlbcookie = 02. This simulates purpose of load balancer, where if you have multiple users, load balancer will balance load in a way where it send user 1 to OpenAM 1, user 2 to OpenAM 2, user 3 to OpenAM 1 again etc. This is called round-robin algorithm (“balance roundrobin” = property from HA proxy config file).